Time: Popularity:0times
You should know the main differences between the Needle Flame Tester and the Glow Wire Tester before picking a fire test. The table below shows how they are not the same. It compares what starts the fire, what each test copies, and what results you get:
| Feature | Needle Flame Test | Glow Wire Test |
|---|---|---|
| Ignition Source | Uses a small, needle-shaped flame | Uses a hot wire to act like overheating |
| Simulates | Copies a small flame problem, like sparks from wires | Copies a part inside a device getting too hot |
| Primary Goal | Checks if a small flame can start or spread a fire | Finds out when things catch fire and if they put out the fire themselves |
| Application | Used for finished products and smaller parts | Used to check if materials are safe from fire |
| Key Measurements | Time to catch fire, how far fire spreads, how long it burns, falling bits | Temperature when it catches fire, time to burn, time to stop burning |
Many companies use both testers now. This is because strict safety rules and recent recalls show that good testing stops fires and keeps products safe.
The Needle Flame Tester checks how things react to small flames. The Glow Wire Tester checks how things handle heat inside devices.
Use the Needle Flame Tester for finished products and small parts. Use the Glow Wire Tester for raw materials and parts near electrical pieces.
Always do the Glow Wire Test first to check heat resistance. Then use the Needle Flame Test to check flame resistance.
Both tests help make sure products are safe and follow fire safety rules. This lowers the chance of fire dangers.
You need good training to use these testers well and safely. This helps you get correct results and follow safety rules.
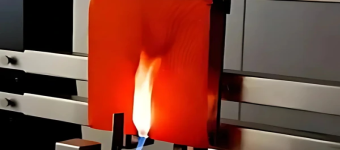
You use a Needle Flame Tester to check how materials react to small flames. This device helps you see if a product or part can catch fire when exposed to a tiny flame, like a spark from a wire. International fire safety standards define a Needle Flame Tester as a burner with a needle-shaped nozzle. The burner uses a specific gas and tests at a set angle, usually 45 degrees. You can measure how long the flame burns and if the material keeps burning after the flame goes out. This test helps you find out if a product is safe or if it could cause a fire in real life.

The Needle Flame Tester has several important parts. Here is a table that shows some of its key features:
| Component | Specification |
|---|---|
| Burner | Stainless steel, 0.5mm inner diameter, 35mm length |
| Flame height | 12mm ± 1mm, adjustable |
| Burner angle | 45° or 90° |
| Gas type | Butane or propane, at least 95% pure |
| Control system | Push buttons or LCD touch screen |
| Safety features | Explosion-proof glass, automatic power-off |
| Test space | Matte black, at least 0.5m³, low light |
You start by placing three samples in the most flammable spot. Fix the samples so the flame can reach them. Set the burner at a 45-degree angle. Adjust the flame height to about 12mm. The flame temperature should reach around 960°C. You apply the flame for about 30 seconds. Watch to see if the material catches fire or keeps burning after you remove the flame.
The Needle Flame Tester uses real-time temperature sensors to keep the flame steady. The device records how long the material burns and if any parts drip or melt. You do not need electricity for the flame, which makes the design safer. Some testers use explosion-proof glass and special exhaust systems for extra safety. The test ends when you record the burning time and see if the sample passes or fails.
Tip: Always check the flame temperature and height before starting the test. This helps you get accurate results and keeps your test safe.
A Glow Wire Tester checks how materials handle heat in devices. It helps you see if a part will burn when it gets very hot. This can happen from a loose wire or a bad connection. The Glow Wire Tester does not use a real flame. It uses a hot wire to act like something inside a device getting too hot.

The Glow Wire Tester is built using strict rules. You can look at the table below to see its main parts and features:
| Component | Specification/Feature |
|---|---|
| Temperature range | 500°C–1000°C, adjustable in 1°C steps |
| Heating element | Nickel-chromium alloy wire, 4.0 mm diameter |
| Control system | Microprocessor-based PID, ±2°C stability |
| Safety features | Over-temperature protection, emergency stop, fume extraction |
| Data output | USB/RS232 for exporting test records |
| Design | Table top, solid case, scratch-resistant |
| Type of protection | IP 20 (IEC 60529) |
| Grounding connections | Protective earthing (IEC 61010) |
| Material | Nickel plated or stainless steel (AISI 304) |
| Current stabilizer | Improves repeatability |
| Remote controller | Allows operation inside closed chamber |
| Test chamber | Draught-free, volume over 0.5 m³ |
Note: The Glow Wire Tester keeps you safe with things like an emergency stop and over-temperature protection.
First, you heat the nickel-chromium wire to the right temperature. Most tests use between 550°C and 960°C. You push the hot wire against the sample with a force of 1.0 newton. The wire touches the material for 30 seconds. This step acts like a part inside a device getting too hot.
Here are the main steps for the test:
Heat the wire to the temperature you pick (between 500°C and 1000°C).
Push the wire into the sample for 30 seconds using a force of 1.0 newton.
Watch to see if the material burns, melts, or catches fire.
Write down if the material burns and how long it burns.
The Glow Wire Tester helps you find out if a material will catch fire or stop burning by itself. It shows the risk of fire from inside the device, not from outside flames. You can save your test results for reports or safety checks.
| Parameter | Value |
|---|---|
| Wire Temperature | 550°C to 960°C |
| Contact Time | 30 seconds |
| Contact Force | 1.0 N |
Tip: Always check that the test chamber has no wind. This helps you get better and more repeatable results.
It is important to know why each tester is used. The Needle Flame Tester checks how materials react to small flames. These flames can come from sparks or tiny fires in electrical equipment. This test helps you see if a product can stop fire from starting or spreading. The Glow Wire Tester checks how materials handle heat inside a device. This happens when a wire gets too hot or a part overheats. You use this test to see if something can resist burning or put out a fire by itself.
Here is a quick comparison:
| Test Type | Purpose | Simulation of Conditions |
|---|---|---|
| Needle Flame Tester | Assesses response to localized ignition sources | Small flame exposure |
| Glow Wire Tester | Evaluates resistance to ignition from heated element | Overheating conditions |
The Needle Flame Tester is often used for finished products and small parts in electronics. The Glow Wire Tester is used for raw materials and parts near electrical pieces. Both testers are important for safety in lighting, electronics, and insulation.
Each test works in a different way. The Needle Flame Tester uses a needle-shaped burner to make a small flame. You set the flame at the right height and angle. Then you watch what happens to the material. You check how long it burns, if it drips, and if the fire spreads. The Glow Wire Tester heats a nickel-chromium wire until it is very hot. You press the hot wire on the sample for a short time. Then you see if the material burns or melts.
Most people do the Glow Wire Test first. This test checks how the material handles heat inside the device. If the material passes, you might use the Needle Flame Tester next. This test checks how the material reacts to a real flame, like from an electrical problem.
Tip: Doing the Glow Wire Test before the Needle Flame Test helps you know if your product is safe from both inside and outside fire risks.
You need to look at the results to know if your product is safe. The Glow Wire Tester gives you two main results. These are the Glow-Wire Flammability Index (GWFI) and the Glow-Wire Ignition Temperature (GWIT). If the sample does not catch fire, or if the flame goes out in 30 seconds, and the silk paper does not burn, the material passes. If not, you lower the temperature and try again. The GWIT shows the temperature when the material catches fire.
The Needle Flame Tester shows if the material catches fire, how long it burns, and if burning pieces fall off. You use these results to see if the material can stop fire from spreading. If your product passes both tests, it meets strict safety rules and is less likely to cause a fire.
Here are some common outcomes:
Glow wire testing works for both raw materials and finished products.
You use the Needle Flame Tester to check fire resistance in electrical and electronic products.
Both tests help you meet safety rules and avoid costly recalls.
Note: Using the right tester helps you follow safety rules and keeps your products safe for people.
The Needle Flame Tester checks if small parts and finished products are safe from fire. It helps you see if a material can stop burning when touched by a small flame, like from a spark or short circuit. Many companies use this test to keep their products safe. Here are some ways people use it:
In cars, you test wire covers and small parts to stop fires.
For home devices like TVs and toasters, you check for fire dangers from electrical problems.
In hospitals, you make sure important equipment does not burn easily.
For phone and internet gear, you test parts to stop fire problems.
In planes, you check plastic parts so they do not catch fire during flights.
For lights, you make sure materials do not burn from electrical faults.
For power tools and meters, you check that plastic cases stay safe if a small flame touches them.
This test shows what happens if a small flame hits a part when something goes wrong. It helps you choose safer materials and follow world safety rules.
The Glow Wire Tester checks how materials act when they get very hot inside devices. It does not use a real flame. Instead, it tests if a part will burn when heated, like from a loose wire or bad connection. Here are some ways people use it:
For electric gear, you test wire covers to see if they burn.
In cars, you check plastic parts and electronics for fire risk.
In labs, you find out how hot plastics need to be to catch fire.
For home devices, you test if insulation or other parts burn in things like kettles and heaters.
Labs use this test to give safety reports to makers.
The Glow Wire Tester helps you see if a material will burn or stop burning by itself when it gets hot. This helps stop fires that start inside devices.
You have to follow strict rules when using these testers. The main rules are:
| Standard | Description |
|---|---|
| IEC 60695-2-2 | Sets the rules for needle flame tests on electrical parts and insulation. |
| GB/T 5169.5-2008 | Chinese rule, like IEC 60695-2-2. |
| UL 94 | Checks how plastics burn, often used with needle flame tests. |
| IEC 60335/60695 | Gives rules for glow wire tests on home and similar devices. |
IEC 60695-2-2 helps you test what happens when small flames touch electrical parts. IEC 60335 and IEC 60695 help you test how materials act when heated inside a device.
People often use both tests together. First, you use the Glow Wire Tester to see if a material can stop burning from heat. If it passes, you may use the Needle Flame Tester to see how it acts with a real flame. Doing both tests helps you follow safety rules and keep people safe from fires inside and outside devices.
You now understand the main differences between Needle Flame Tester and Glow Wire Tester. The table below explains how each test helps you follow fire safety rules:
| Testing Method | Description | Purpose |
|---|---|---|
| Needle Flame Tester | Uses a needle-shaped burner to copy small flame problems. | Checks if small parts can resist fire during accidents. |
| Glow Wire Tester | Uses a very hot wire to test fire risk from heat. | Tests if materials can resist burning when they get very hot. |
Pick the tester that fits your product and safety rules. Knowing about these tests helps you keep products safe and follow the law.
What is the main difference between a Needle Flame Tester and a Glow Wire Tester?
You use a Needle Flame Tester to check fire risk from small flames. You use a Glow Wire Tester to see how materials react to heat from inside a device. Each tester simulates a different fire hazard.
When should you use both tests together?
You should use both tests when safety rules require it. Start with the Glow Wire Test to check heat resistance. If the material passes, use the Needle Flame Test to check flame resistance. This approach gives you better fire safety.
Do you need special training to use these testers?
Yes, you need training. You must learn how to set up the equipment, follow safety steps, and read the results. Proper training helps you avoid mistakes and keeps you safe during testing.
Which standards should you follow for these tests?
Always check the latest standards.
You should follow IEC 60695-2-2 for Needle Flame Tests and IEC 60335 or IEC 60695 for Glow Wire Tests. These standards help you meet global safety rules.
Company Phone
+86-21-6420 0566
Working hours
Monday to Friday
Mobile phone:
13816217984
Email:
info@qinsun-lab.com